Setting the model up
We are going to use Python 3 to create a model for our Pelican crossing and we are going to use the turtle in Python to help us. You may have done some turtle programming in Primary school - it's just the same in Python! If you haven't used Python or the turtle before, your teacher will show you how to get started.
The first thing we need to do is to write an algorithm for Python. We have actually already described how our Pelican crossing will work here:
| Comment | Red light | Yellow light | Green light | Wait light | Red man | Green man | Buzzer |
| Cars going normally along road. | Off | Off | On | Off | On | Off | Off |
| The button is pressed and you wait. | Off | Off | On | On | On | Off | Off |
| Eventually, the lights start to change. | Off | On (2 secs) | Off | On | On | Off | Off |
| Now you can start to cross. | On | Off | Off | Off | Off | On (flashes) | Beeps |
| After 5 seconds, the lights start to change. | Off | On (flashes) | Off | Off | Off | On (flashes) | Off |
| Cars going normally along road. | Off | Off | On | Off | On | Off | Off |
We will assume that you haven't used Python before so we need to take our time and develop the model in stages. The first thing we will aim to do is to draw a simple set of traffic lights. In Python, we will do the following:
Import the turtle tools to help us draw.
Import some time tools to help us with time.
Import some sound tools to help us create sounds.
Make a white canvas so we can draw on it.
Create a turtle called Fred, which we will use to draw with.
Create a function that can quickly draw any circle of any colour in any position we want.
Draw the red light.
Draw the yellow light.
Draw the green light.
Hide the turtle.
When you have a very clear description like this, it is known as a 'model'. When you run your model and see what happens, that is called a 'simulation'.
Q1. The code to do this is shown below. Type it in to Python and get it working.
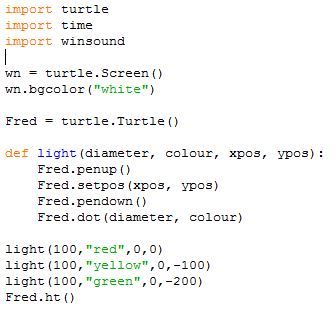
If everything went to plan, Python should have drawn this when the program was run:

Every time we want to draw a light, we use the function called 'light'. We don't need to know how this function works, except that it does draw a light. To use the function, you simply write the command word 'light' followed by four pieces of information in brackets. The first number is the diameter of the light. The second piece of information (which must be in quotes) is the colour. The third piece of information is the x co-ordinate of the centre of the light and the fourth is the y co-ordinate of the centre of the light. (0,0) is in the middle of the screen.
So if we want to draw a circle that has a diameter of 100, is green and at position (0, -200), we have to use the command:
light(100, "green", 0, -200)
Q2. Experiment for fifteen minutes! Try changing the lights by changing the diameter, the colour and the X and Y co-ordinates. Try adding more lights in different positions. Use the Internet to find out what colours you can use, and also what numbers instead of colours you can use!
Q3. Now you know how this program works, change the red and yellow lights so they are black.
Q4. Create three more lights to the right of the traffic lights. The top and bottom lights should be very light blue. Use the colour 'lightblue' in the code. The middle one should be red. These are going to represent our wait light, the red man light and the green man light. If you have done this correctly, you traffic lights should now look similar to this:

This is the starting point for our Pelican crossing. It represents the first line of our description (see the table above) where cars are going normally along the road. The main green light is on, as is the red man light. Everything else is off. We can now re-visit our model and improve it.